The easiest way to test a
packet-sniffer of any type is to capture data that you already have (for
example, a known web page). The reason for this is so that you can then compare the captured
data to the existing known-good data to ensure it is the same and has been received in
its entirety.
In this example, we'll record the
traffic between a client (telnet - a common utility found on most operating
systems) and server (a web server located at www.diamondcs.com.au),
where the client will make a simple 'HTTP GET' request to retrieve a page from
the www.diamondcs.com.au web server.
We're using telnet for this demo because it makes it a lot easier to see the
data being received by the client (telnet), but for all intensive purposes you
could use a web browser instead of telnet.
Our target is http://www.diamondcs.com.au/portexplorer/spytest.htm
spytest.htm is a file exactly 100 bytes in size. It contains just one line
of text (no carriage-returns or line-feeds):
<html><title>Port Explorer: Socket Spy Test</title> <body>Hello there, packet-sniffer!</body></html>
We'll now use telnet to connect to the www.diamondcs.com.au
webserver and request a web page, in very much the same way a web-browser
would. To do this, from Windows click on Start, then Run, then enter this
command:
telnet www.diamondcs.com.au 80
Look in the main
Port Explorer window to find the telnet socket - it should be easy to find,
simply look for a socket that has telnet as the process, www.diamondcs.com.au
as the remote host address, and port 80 as the remote port. When you have found
this socket, right-click on it and go into the Process submenu, and select
Enable Spying. Port Explorer will now capture all packets sent/received by this
particular telnet process.
Now we'll use telnet to
send a request to retrieve a webpage, just as a web-browser would. After the
connection is established, type in this line of text (you may not be able to see
the characters appear as you type them, depending on your version of telnet and
local echo settings):
GET http://www.diamondcs.com.au/portexplorer/spytest.htm
HTTP/1.0
Then press Enter TWICE (one carriage return tells the web-server youve finished
sending the current line, two carriage returns in a row tells the web-server
that you've finished your request). If you have correctly typed the request, the
web-server will respond with data resembling the following (some fields may
change):
HTTP/1.1 200 OK
Date: Tue, 24 Sep 2002 02:46:13 GMT
Server: Apache/1.3.22 (Unix) (Red-Hat/Linux) PHP/4.0.5
Last-Modified: Mon, 23 Sep 2002 17:12:39 GMT
ETag: "15ea08-64-3d8f4b87"
Accept-Ranges: bytes
Content-Length: 100
Connection: close
Content-Type: text/html
<html><title>Port Explorer: Socket Spy Test</title> <body>Hello there,
packet-sniffer!</body></html>
Highlighted in light-blue the spytest.htm file data can clearly be seen
(and the "Content-Length" field indicates 100 bytes) -
we know that the file has transferred correctly!
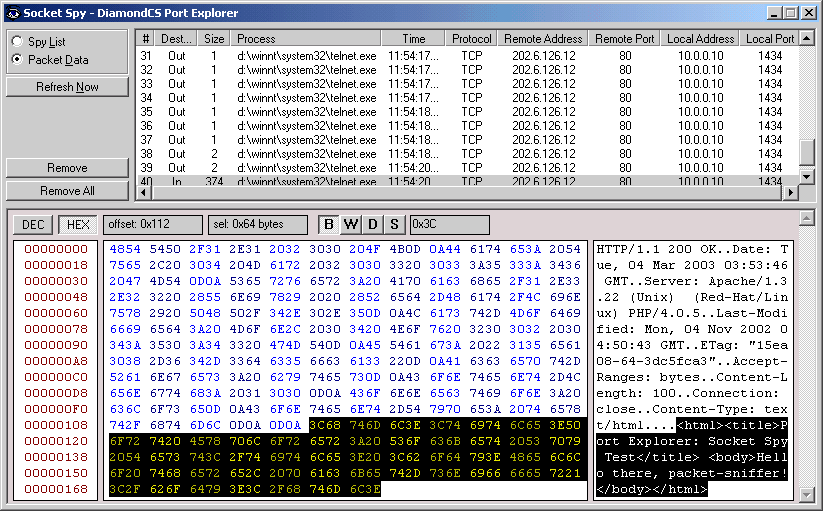
So now lets see what Port Explorer has
captured. Click on the Utilities menu in Port Explorer and select Socket Spy.
The Spy List will probably be empty, this is because Port Explorer would've
automatically removed the entry for the telnet process when the socket was
disconnected from the webserver.
Click on the first packet (#0). You'll
see the following single byte in the data window:

The reason we can only see one byte in this packet is because telnet sends each
character as it is typed (as opposed to waiting for the user to press enter, and
sending all the characters in one packet). The first column in the data window
is the byte offset in the packet, the second column is the received data
displayed in hexadecimal format, and the third column is the data displayed as
text, so here we can clearly see that we have sent "G" - the first key
we typed in our GET request.
Now scroll down to the last packet. You'll notice that the second and third
last packets both consist of two bytes, with their hex-formatted data showing
"0D0A" - this is a carriage return and linefeed, sent by telnet when
you pressed Enter. We pressed Enter twice, so there are two such packets. The
last packet received is the only packet with "In" as its destination,
so we'll select that. It has a large size - several hundred bytes, so we can
tell that the web server has sent its response in a single packet. Here is a
screen capture of the packet as received by a test machine here at the DiamondCS
lab. The actual file in the packet is highlighted using Socket Spy's new-look
easy-to-use packet viewer.
We have successfully captured the entire session between the client and
server and all packets received have been stored in capture.bin, which we
can save to view at a later time.
Copyright ⌐ 2002-2003 Diamond Computer Systems Pty. Ltd. - http://www.diamondcs.com.au
DiamondCS Port Explorer Website - http://www.diamondcs.com.au/portexplorer